
This is the first in a series of How To posts inspired by good friend and fellow Tennessee blogger, Gail of Clay and Limestone. She suggested a post be written on how to make the concrete balls that were shown in a recent post about the concrete projects that have been done over the years at the Fairegarden. Click here to read about Fun With Concrete. Glad to oblige, Gail. Hope there is some interest out in the blogdom for such a series. If not, this will be the first and last how to. And thanks for the lavender marker, my friend, it looks good next to the lavender plant, a bit of rock from Brokenbeat’s place and that old concrete ball.



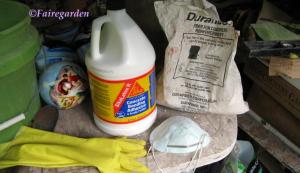
First gather up your ingredients. No, check that. First, figure out a good place to do this project. It helps if you can stand up fairly straight, to save your back. I have an old plastic patio table under the garage deck that is the home to all projects involving concrete products among other hobbies. Click here to read about this space. Underneath the deck floor is lined with the extra metal from the roofing to make it a waterproof space, out of the hot sun. It is a mess, but very useful. Okay, onward. Gather your supplies. For this project, a bag of perlite and a bag of spaghnum peat moss, found at a big box home improvement store in the house plant section will be needed. A bag of Portland cement, only available in ninety-four pound bags unfortunately, is kept in a wheelbarrow in the garage. This must not get wet or it will harden rock solid. You should have a mask, for the cement is like dust and flies all over the place, especially up your nose and into your lungs. No to that. You need some latex type gloves. The Financier bought these instead of the clear package of ten that was on the shopping list, and I like them much better for they are longer and stay up better while working with the wet stuff. A bottle of concrete bonding agent is always used here to add strength to the projects, same with the fibermesh. The cement and bonding agent can be found at the same big box store. The fibermesh was found at a concrete establishment that used to be near my house. I asked if they would sell me a small quantity and they gave me the bag. Everything should be assembled ahead of time because once you begin, you need to go start to finish before the mix starts to harden.

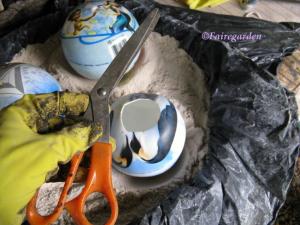
You will need some sand in a container to allow for the rubber children’s play balls to maintain the round shape and hold them still. I use a large round metal feed dish from Tractor Supply. I actually use many feed type things from that store for garden uses like seed starting and mixing potting soils. They are cheap, store easily and are made from metal and rubber. I line the dish with plastic to be able to move the sand around from project to project and cover it to keep it clean between uses. Since the finished balls will need to be covered with plastic while they cure, it is easy to fold up the edges over the tray. We are making three balls today. They are set into the sand about one inch deep or more. Scissors will cut the tops off so the mix can be inserted easily. I made about a two inch diameter hole in each, cutting where the plug is to inflate the balls. This plug makes a depression into the finished product if not cut out at this point. It might be a good time here to mention that some of these instructions are variable and some are not. This is the way I do it after many many projects, and these tips are to help you have a more enjoyable time with the least amount of problems. Trust me, there is a reason for every step.
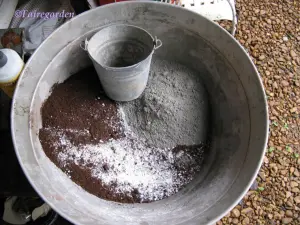
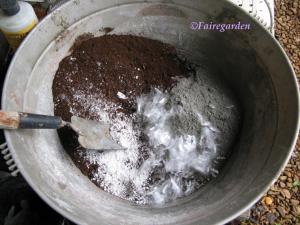
Allrighty then. Let’s mix. A plastic tub from Big Lots is used for mixing. It is placed on a wooden bench next to the table to get some leverage for this task, for I am not strong. Having it lower lets you see that everything is combined well. A long handled garden trowel, also from Big Lots is the mixing tool. I used the small metal bucket to measure out the perlite, peat moss and cement in equal amounts. I filled the bucket nearly to the top with each. Then add a small handful of the fibermesh. If you cannot find this stuff, it can be omitted, but your project may crack and fall apart if left out in freezing temps. All of the projects we have done have been left outside in the elements for several years with no breakage. The mesh works magic. Mix the dry ingredients well, really well. Use your gloved hands to break up any lumps in the cement or moss. Spread the fibermesh into the smallest pieces possible, time consuming but worth the effort before you add the liquid.

Time to add the liquid. I use an equal amount of bonding agent and water, sort of, more water is added to make it the right consistency. I add about one half cup of bonding agent, an equal amount of water and begin stirring. It is better to add more water a little at a time until you get the consistency desired. Too wet is not good, but too dry will not work well either. Oatmeal has been mentioned as what you are looking for, but I like it a little drier than that since I make oatmeal a little runny. Make sure all the dry ingredients have been well wetted, like making a cake or brownies.

A large image is shown here because this is what your mix should look like. It should hold together in your gloved hand with a little pressure. The fibers can be seen mixed in nicely. The tub was moved over to the wall for better light to take the photo. It should be mentioned that trying to take pictures of this procedure without getting concrete or other stuff on the camera is quite difficult. Onward.

We sort of messed up here. At the same time as the balls were being made, we decided to try making a gourd too from an old dried gourd, strictly a prototype. There will be a seperate post on how to make a concrete gourd at a later date. The photo was taken of my hand putting the mix into the gourd rather than the ball, but it is the same procedure. Scoop a handful of mix, squeeze it a little to the shape shown and lower it into the ball. After several handfuls of mix were in, poke your finger inside to push the mix towards the bottom and remove any air pockets. For a larger project, use a stick. Keep adding the mixture until you get to the top. Push your finger down to get it well distributed and top off even with the ball.

After all three balls were filled, they were left to begin hardening. After a few hours I went back and covered the whole thing with the plastic edges used to line the tray. Now you need to wait about twenty four hours for the initial curing.

After the twenty-four hours has elasped, put on your gloves and feel the balls. If they feel hardened, you can now take the rubber off. Be very careful though, they can still break apart easily. You must use your most delicate touch. To lift the rubber from the concrete a nail was used. After the camera was put down the scissors were used to snip where the nail was holding the rubber away from project.


The rubber ball will tear away in a spiral down the rest of the way. On a couple of the balls, there was some concrete sticking out because the ball was overfilled. It can be cut away very carefully with a razor blade tool. It could also be left and be the bottom of the ball when it is placed in the garden. I cut away the excess and made a mental note not to overfill next time. I thought it might settle some, but it did not.

It is hard to measure exactly for each project and I have found it is better to have a little extra mix than not enough. Sometimes we make free form objects, like my avatar Mrs. Bongo Congo, but today we used a plastic tub for the leftover mix. The tub was lined with plastic wrap to make it easier to unmold. The idea was hatched to make several of these tub shapes, all the same height, to be used as stands for the balls or other things. Waste not want not we always say.

Here are the finished balls and tub, rolled in sand for no reason at all. They are in a plastic tent using an old mulch bag. Those bags that mulch come in are perfect for these concrete projects. Most things will fit easily inside and they are free if you ever buy mulch in bags. The hypertufa balls will need to cure for about a week before being placed out in the wild. This curing time will allow the concrete to set up and become very very strong. It is important that they are covered head to toe in plastic to allow the process of drying out to go slowly. It is the same as concrete sidewalks, the slower the drying, the stronger the product will be. If these were to hold plants, there would be another curing step to leach the lime out of them, but since these are strictly ornamental they can finish curing in the garden.
~~~

Above is the finished product, washed, cured and ready to be placed wherever a spot exists crying out for concrete balls. I hope this will inspire some to try making these for yourself. A cluster of them scattered in a nonchalant way adds a touch of whimsy and dare it be said, art to the landscape. Enjoy!
*Instead of the hypertufa mix, quikrete can also be used. The first photo shows a ball made using leftover quikrete from another project. Mix according to the directions on the bag and prepare the balls in the same way. This is a good lesson in working with the hypertufa though, good practice for making pots and troughs, learning how to mix and the amount of liquid to add comes with experience. These hypertufa balls are an easy way to get to know your hypertufa!
For other How To posts written by Fairegarden, look for How To on the sidebar page listing or click here.
Frances






Frances, Thank you so much for these very clear and step by step directions. I was at a concrete place this summer, and the retailer couldn’t understand that I wanted a concrete ball. He thought that I was crazy. Now I am going to be making them for myself, even better, I can have twice as many for the same money.
Deborah
I would also like to thank you for this post, Miss Frances. We have a sloping yard in the back, here in Kingston Springs. It’s beautiful, but hard to figure out how to dress it up sometimes. My husband saw your posts, the pictures of your slope with flowers, and the hypertufa instructions…he came home with a whole palate of concrete! 🙂 He says he’s getting the other ingredients next week.I guess I know what we’re doing this winter/spring/summer/fall – cheers! Happy gardening.
What is it about these concrete balls that so many of us seem to love ? That and cast iron objects .. there must be some deep Freudian explanation of it all .. but for the life of me I can’t think what other than .. we .. just LIKE THEM !! haha
Great step by step girl .. just the way I need it .. dummy proof !! : )
Joy
Hi Joy! We would love to make a large concrete ball so people do not drive over the end of our garden…and they look lovely too! We are fed up with cars driving over our tin tubs and dragging them acros the road! Unbelievable. Its mostly those global destroyers! Cant wait to make one! Thank you. Louise
I have always wanted to do such a project. I thank you for this tutorial Frances. You make it appear so simple. Hmmmm…. I will give it a try.
Hi Frances – Love the concrete balls, very eclectic and they seem fairly easy to make. May have to try one to add to my concrete jungle.
Keep the “how to’s” coming!
Are you kidding me? This should not be your first and last ‘How To’ post!! I love to learn how to do new things through other’s trial and error!!
I agree with Darla! These “How To’s” are wonderful! I have always been intimidated by projects and with the step by step information and photos to compare, I feel I can do this Concrete Ball project…off to Lowes!
Great great post !!!
This is a keeper for the future.
What a super job you did with the step by step instructions and pictures(gotta have pictures).
I bought a concrete gargoyle while in a gallery in Ashville… and his bum is crumbling away this year. He won’t last much longer. So sad! He must not have heeded your weathering precautions.
Thanks for the instructions, Frances. I may actually try this project one day, as I adore concrete balls in the garden. I am hankering for a pretty big one though and wonder what mold could be used for a larger size. The trick there would be the weight, I suppose.
Definitely inspired me. I was actually going to make some the last time you posted on them. Did you get a marker stone kit? I see you now have a handy lavender stone. Love those marker stones! And the balls-I need about a dozen. Are you taking orders?:)
I like the idea of how-to’s, especially tufa. I assume this recipe works for all kinds of shapes, right? the world is open for possibility!
Very cool post Frances, and great timing! We’re going out today to play in the concrete with the girls. Decorated stepping stones today no balls but that is a neat idea and something I will eventually do!
Love this post. I can’t wait to make some balls for my garden. Thank you, Frances.
Frances, I love the post;) Thank you for the important details that people with a detail deficit, like me, might miss! Now where can I set up a concrete station….I do my big mosaic grouting in the weedy lawn behind the carport! ;it makes the mosquitoes happy. I can’t wait to see the gourd project! You’re very welcome on the Lavender marker and thank you for the link love. Have fun out there. gail
My pea brain is whirring! 🙂 I can imagine using a larger ball (small beach ball?) and inserting a small to medium sized clay pot, until flush with the top. What a unique planter that would be, especially set out in various sizes on steps. Hmmm. ::scratching chin:: Your instructions were excellent, and I do love the concrete balls just as they are!
Thank you for posting this, Frances! Your instructions are so clear and detailed that I think even I could follow them (you could get a job writing technical manuals):) I have lots of projects in my house waiting to be completed right now, but I’m going to bookmark this page for future reference.
Hi Frances, I love your concrete balls and what a great way of telling/showing all the details. The finished products look superb. Please keep posting your “How To” details. Very inspiring.
Hi Frances I love your balls and it doesn’t look that complicated to make them either. I got to have a go with it. Thank you for sharing.
Happy gardening weekend! xoxo Tyra
@nancybond: If anyone else is considering making something like this into a planter, remember to add drainage through and out the bottom. I once filled a large pot with cement and inserted a post with a birdfeeder on it, then we put in several drinking straws from the bottom of the small pot out the bottom of the main larger pot. Then I filled the small one with potting soil. It dries out very quickly, but does work.
I have summoned you and Gail to run over to my place and see what’s happening!! Bring all of your friends!!
It’s great, Frances! Thank you!
What a neat project, thanks for giving us detailed instructions. I’ve never worked with hypertufa let alone concrete so this will be helpful for future projects. I like the balls and the tub shape as a stand is a cool idea too!
Thanks for posting! The balls are so nice and I want to try! I can use a few of them!
Wow! What great pictures and instructions. I felt like I was looking over your shoulder and learning.
What great info. I’m archiving this link for future use. I’ve done hypertufa pots using old straw baskets for texture, but I love the idea of balls – especially since I eventually break all those pretty colored glass reflecting balls.
Thanks Frances I keep thinking about doing it.
Thank you for the directions! I am interested in trying this type of project! PS–I tagged you for a meme; check out by blog to see what it is!
Thanks for the info Frances. I must try this as soon as my peepers are ok. I do need something in my garden that looks like that.
This was great! We do have half a bag of quickrete and I think I just may try this soon. I guess you could use any size ball then too then. Those play balls are all different sizes and pretty inexpensive.
I love them….I am going to try one for sure!
Hi Frances, Thank you for the great directions. I visited a friend today and we made (my third experience) a hypertufa container. I hope the mix wasn’t too dry… what might happen if it was??
Anyway, our plan is to make concrete balls next week. Using the hypertufa mix is a great idea for another reason: they’ll be much lighter-weight and easier to handle. Thanks again, Frances!!
HEY!!! The birth of the Monarch is posted!!!
Thanks for the tutorial Frances! I will have to try that.
I’ve gotten lazy with age. And concrete is heavy. I think I’ll just keep reading about and watching you play with hypertufa. ;~)
Hmmm, I ponder if one could stick eyes in those balls. Enjoyed the concise how to do Frances, merci 🙂
What a fun project! And placing them in a nonchalant way? Judging by the care you write about your garden and putting together this How To guide, I wasn’t expecting nonchalant to be in your vocabulary 😉
Have a great Labor Day weekend!
Crafty stuff indeed. It’s always so satisfying making things such as these.
I often see similiar ornamental objects for sale in garden centres and marvel at the unfeasibly high price. The kinda price where you wonder if there’s been a mistake with the decimal point. Thrify indeed. Now there’s a recessionary theme, thrifty gardening.
Love it! Thank you so much for sharing. I will definitely attempt to make some.
Who can resist concrete balls for the garden? I can’t. Thanks for the easy to follow directions. Now to gather what is needed and get busy.
Ooh, I love concrete balls in the garden but had never thought about making one myself. I still may never do it, seeing as how I’d have to buy so many things I don’t usually need (like all that cement!), but just knowing that there’s a way to make them makes me happy. I guess it’s the little things. 🙂
Hi there, thanks for the instructions, we are always looking for new shapes to use in hypertufa making, the balls are fantastic, never thought of it! Perhaps you’ve not yet stumbled on my blog perhaps you have…in any case I do have a link to your blog on mine, as a fellow TN garden blogger, and also for the benefit of my dear friend Diane at Garden’s OY Vey Nursery here close to Memphis check out my blog for a mini-feature on her place. petalsandvines.blogspot.com..enjoy!
Well, I guess you have your answer that everyone is indeed interested. sounds like fun and messy…my idea of a good time! I will add it to your other projects I have bookmarked. Thanks so much
I have always wanted to make planters, but have always felt it was too big of a project for me. I think making balls would be a good place to start–not to mention a fun addition to the garden–not to mention a chance to play in the mud! Thanks for taking the time to show us how.
When my husband attempted to repair our front steps, I made a couple stepping stones. One of them broke when my husband decided to take it out of the form after it got rained in and water was standing in it. The other has my pretties sticking out of it, so won’t be able to be stepped on.
When the neighbor gets the time to help Larry fix the repair job, maybe there will be more leftovers and I can make a few balls. I like how yours turned out. Thanks for the directions.
Btw, when I clicked on your name from the comment on my blog, I got to your blog, but the photos didn’t show up, so I came here through the link on my sidebar.
Hello Frances, I´ve just found your blog and I´m amazed for the wonderful garden you have created and the incredible pictures you take. If you don´t mind I am adding you to my list of blogs. I live in Chile, southamerica and have created my blog recently and have pictures of my home and garden. I live up to 1080 mts over sea level in the Los Andes mountains.
Thank you for such an amazing blog and the work you do.
María Cecilia
What a nice tutorial! I want to make a few hypertufa pieces (large planters and balls) and have some good instructions. Yours add such a nice touch with the photos. And seeing so many ways you have incorporated the artwork into your gardens is so inspiring! Thank you.
Somewhere down in the Tennessee world, perhaps near Boone National Forest, there are concrete reinforced walls created with cement-in-the-bag and water. Not made by mistake, but intentional, the walls really caught my husband’s attention. We had some chuckles and good conversation over them, mostly because they were darn effective (and very solidly made)!
Lynn
http://woodridge.wordpress.com
I have always been interested in hypertufa What are the most requsted items in this material
Hi Vivien. I normally send comments like this to the spam file, but have just deleted your link instead for this is a valid question. I don’t sell the hypertufa items, just make them for myself and family members. The most requested is the trough container.
Frances
i used your info to make a ball but my problem is that the bottom of the ball is smushed, it did not keep it’s roundness. How do I fix that? I had it in a wheelbarrow with sand at the bottom.
Excellent how to!!! Now I am on a mission; must find all children’s play balls! Thanks again for all your time and effort posting these how tos, I know they are a lot of work!
…This is fantastic and thank you!
…Happened over here via Dirt Du Jour and am glad I did! Perfect instructions, photos, everything – I will definitely be doing this for my gardens…
…Thank you again and blessings too… :o)
I happened upon this via Dirt Du Jour as well. Love it, love it, love it!! Is there any way to produce colored hypertufa-concrete balls?
Can’t wait to give this a try! Using the children’s plastic play balls (14-16″ ?) and the l/1/1 perlite, moss, cement ratio, about how many balls can one expect to produce from a 94 pound bag of portland cement?
This is interesting. Have you ever tried to make a ball that is partially hollow eg so that something can be grown in it? I’m wondering about using this technique but instead of filling to the top, pushing a plastic container in to make a hollow indentation. Any thoughts?
Thanks – I’ll let you know when I have!
This is a wonderful how to! Really like the Step By Step instructions. Thanks so much! 😀
I’ve been wanting to try hypertufa for years. This sounds like a good way to start. Thanks so much for the tutorial!
Donna
Pingback: Debra Prinzing » Blog Archive » Concrete orb how-to
Thanks for the directions but I plan to use quickrete and use a rubber tube inside the middle so I can use one ball for water to run out of it as a fountain. I plan to make a lot of them to put in my front yard and my back yard. I will also buy some stain and stain them red, black and white. I have a gray house with black shutters and a red door. I cannot wait. If all go well maybe I’ll make enough to sale. I can see schools mascots, favorite teams, social club oh the list go on and on.
Thanks a mill. I saw these balls in front of Target and wanted some ever since now thanks to you I have the way to make them although I thought using a beach ball would have done the trick. Thanks goodness for Big Lot its right up the street from my house.
This is awesome for someone wanting to experiment with concrete!!
Using Quickcrete, we failed miserably at this project. The balls were not stiff enough to hold the concrete in a round shape and we ended up with a real mess. EXACTLY what kind of balls do you use? You say rubber, but the plastic ones in the big bins at Big Lots, Walmart, and Target are a soft plastic which calapse when the hole is cut into them. Can’t seem to find those rigid plastic balls our kids used to play with years ago. Help! We need something that will stay round.
Pingback: Sowing Seeds: — A Cultivated Nest
Pingback: October Ramblings « Fairegarden
I just stumbled on your Blog and LOVE it! Can’t wait to make my Hypertufa Balls…what the heck does hypertufa mean? I didn’t see it in the list of things to gather. If this is one of those gardenese words, I do hope you will forgive me, but I am just now learning to speak it.
Also, I saw on one of your other postings a beautiful photo of a Fathagilla (again for the same reason as previously stated, may not be correct spelling) shrub. I acquired it fall before last and it has yet to turn any color of autumn, ever!…it is now October and I am in zone 7a. What it is lacking in beautiful fall color, it has more than made up for in ugly dark spots on green leaves. Any help would be appreciated by both me and the shrub, because I am thinking of pulling it out next spring.
Your instructions are great – – so succinct and clear! What would you use to run through the center in order to accommodate tubing for a fountain? And at what step would you poke it through? Thanks! Lisa
Pingback: Catgoods For Thanksgiving « Fairegarden
Pingback: Art at Keppel Croft « Green Theatre
Great direction, Frances! I have never done hypertufa. Is this material sturdy enough to mosaic? I do crash-glass mosaic (shattered tempered glass) and I want to do some yard spheres, in crash-glass. My substrates are usually fiberglass forms, old windows, concrete backer board, etc. I tried another method, with fiberglass mesh and vinyl cement, to cover plastic balls, to make speres, but it was SO expensive and SO difficult, that I gave up! I’d love this idea to work……….
OK I still haven’t made any of these yet but . . . you could either make a concrete ball as shown above, then stick bits of mosaic to it when it’s hardened and out of it’s mold. You might need to fill in the gaps between the bits of mosaic with concrete mixture (like grouting bathroom tiles).
Alternatively you could using a water soluble glue fix bits of mosaic to the inside of the mold sphere. Then pour the concrete and the mosaic bits would be naturally bedded into the concrete. Then take off the mold and wash away the glue. More difficult probably!
Best of luck!
Pingback: From Me To You* « Fairegarden
great tutorial,,,now i have a few ideas of my own, please do keep the dui’s coming! love this. ty.
My concrete balls are curing on the patio as I type. Thank you for the inspiration!
Of course you know you have been “pinned” and we are all LOVING the idea of making concrete balls. thanks you so much for the tutoial. I love when the teacher realizes I don’t have a clue and need lots of details AND pictures. Thank you! Would you happen to have an estimate of materials used to make say a 12 ” ball? or whatever size? And, is your measuring bucket about 2 1/2 gallons? Can’t wait to get started on this project!
Thanks so much for sharing this. I can’t wait to make a whole bunch of them! A really great blog too.
-Susan
I made these cement balls many yrs. ago using old glass light fixtures. Break the glass when cured. Was alittle more dangerous with the broken glass. I also put branches of cedar or fern for texture. They were very cool. Put the branches in before you put cement. After remove branches and they leave neato design. Also washed them with green to make them look mossy. Fun
Your hypertufa balls look great and I’ve got this linked to my hypertufa post too today!
Pingback: How To Make A Hypertufa Trough « Fairegarden
Pingback: Planting a Winter Container « Fairegarden
Pingback: More Moss Magic « Fairegarden
Thanks so much for these instructions! Have always been a diy-er and can’t wait until spring to make these for my garden, my mother-in-laws garden, my sister-in-laws garden…..love that there are creative people out there willing to share their genius with others!!
I was wondering if you could leave the perlite and peat moss out and make the balls to use for the weight. I have to pull the garden hose and sometimes it goes onto the plants. If I placed the HEAVY ball painted like a ladybug it would save my plants and be garden art. Do you think that would work?
Thanks, going to give this a try – you’ve given the easiest instructions I’ve found – so many ideas running around my head – need to catch them and write the down before they get away!
Wow, this was a GREAT post, and really got my imagination going. I liked the previous idea of something large to keep people ON the driveway. Has anyone thought of cutting a LARGE plastic ball in half, sinking it in sand nearly to the rim to keep it’s shape, filling both halves and then putting together with dowels or pipe. You could use a template on both halves to place holes with garden hose pieces that could be cut out later. I even thought of drilling a hole at the top later to place a solar light. See what I mean, the juices are flowing…….Thanks SO much for your post (originally found on Pinterest), Debbie
Hi. Great Post. Was unsure as to what this meant, .” After a few hours I went back and covered the whole thing with the plastic edges used to line the tray. ” Can you clarify please. Tks